Flash Tutorial: Animating a button using a mask effect
Flash Tutorial: Animating a button using a mask effect
Level: This is a beginner lesson, but I will assume that the reader is familiar with the basic use of the Flash software including stage, timeline, drawing tools, property window, etc..
Version: I will be using Flash CS3 and AS2 (although tut is compatible with earlier versions of Flash) and instructions are for the Mac. Windows users would use the PC counterparts for specific instructions on Flash Menu/Shortcut instuctions.
Description: In this tutorial, I will explain how to give a button animation on rollover by creating a button as a movie clip symbol and using a mask effect.
Demo:
Let’s get started!
Select “File > New” (command-“N”) and select Flash File (ActionScript 2.0) to open a new Flash document file. Save the file, and give it the appropriate name. I will call this “btnWIthMask_tut1.fla”. Feel free to change the document dimensions to whatever you like (“Modify > Document or “command-J”), but for the purpose of this tutorial, I will use 250×100 pixels.
The first thing we will need to do is draw a simple shape for our button. Select the rectangle tool, set your fill color to the black and white linear gradient and a stroke of none. In the property window (Window > Properties > Properties or command-F3), set the corners to slightly rounded, I chose a 5 pixel rounded corner. Draw out a rectangle approximately 100×20 pixels. Tip: You can use the up or down arrows on your keyboard when dragging out your rectangle shape to increase or decrease the roundness of your corners. You should have a rectangle similar to Fig. 1.

Select the rectangle, and convert to a movie clip symbol (Modify > Convert to Symbol or F8). Remember, we are creating a movie clip button, so be sure to select the “movie clip” radial. Give your symbol an appropriate name, I called mine “mc_btn1″. Double click on your rectangle to bring you into the symbol editing mode. Select your rectangle and let’s adjust the gradient and on our button with the “Gradient Transform” tool. Tip: the Gradient Transform tool is grouped with the Free Transform tool in the tools pallette. With the Gradient tool selected, click on your rectangle and in the color pallete, set your gradient scale to be 100% black on one end and 100% dark grey (#666666) on the other. With the rectangle still selected, rotate your linear gradient to be vertical (Tip: Hold shift when rotating to snap to 45º angles), with the 100% black on the top and the grey on the bottom. Also, shrink the gradient tool so that it is the height of your rectangle. Fig. 2 shows what your rectangle should look like with the gradient tool selected.

Let’s add a little additional styling to our button by going to our tool palette and choosing the Selection Tool (V), selecting our entire rectangle, choose “Edit > Copy” (cmd-C), add a new layer and choose “Edit > Paste in Place” (shift-cmd-V) to paste a new rectangle on top of our original. Now, select the new rectangle, rotate it 180º and cut the height in half (about 10 pixels). Tip: You can adjust the height of your rectangle using the Info pallette (“Window > Info” or cmd-I) and inputting the “H” field. Lastly, move the smaller rectangle so it aligns with the top of your original. You should now have a shape that looks similar to Fig. 3. This will be the base of our button.

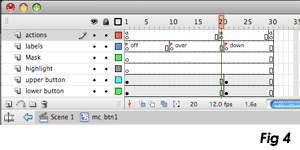
For our animation, we will just do a simple “highlight” effect when the user rolls over the button. Before we start doing the animation, let’s set up our timeline. Let’s start by labeling our rectangle layers… the bottom one we can label “lower button”, the top one “upper button”. Now, add 4 new layers above these. The top one should be labeled “actions”, the second layer “labels”, the third one “mask” and the 4th “highlight”. Extend the keyframes for all layers to frame 30 by selecting Frame 30 on all layers and choosing “Insert > Timeline > Frame” (F5). On the “labels” layer, insert a new key frame (“Insert > Timeline > Keyframe” or F6) at frame 10 and 21. Select frame 1 of your labels layer, and in the Properties panel (“Window > Property > Properties” or cmd-F3), give your frame a label of “off”. Next label frame 10 “over” and frame 21 “down”. Finally, on the “actions” layer, let’s add a new keyframe at frame 20 and on our last frame. On frame 1 of our actions layer, add the following code to our Actions panel (“Window > Actions” or alt-F9):
stop();
Do the same thing on frame 20 and the last frame of our “actions” layer. All this code does is stop our movie clip from playing on these particular frames, since for our end result we want the users mouse to control our timeline. Your symbol timeline should now look similar to Fig. 4.

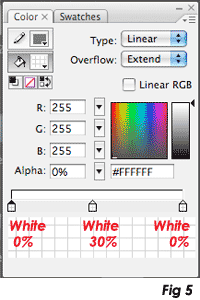
Now that our timeline is set, let’s build our animation. Let’s lock all our layers, except the one labeled “highlight”. On our “highlight” layer, insert a new keyframe at frame 10. Select our rectangle tool, with a fill of linear gradient and a stroke of none. Draw a rectangle on the stage with a height of about 40 and a width of about 20. With our new rectangle still selected, use the gradient transform tool and set the gradient as left side 0% white, center 30% white and right side 0% white. (Fig. 5). Choose “Modify > Convert to Symbol” (F8) and make your new rectangle into a “graphic” and give it an appropriate name. With your rectangle symbol selected, rotate your rectangle and move it just off the top left corner of your button. Finally scale your rectangle to about 50%. When your rectangle is selected with the transform tool, it should look similar to Fig. 6.


Next, add a new keyframe to frame 20 of our highlight layer. On frame 20, move your rectangle to the bottom right corner of your button (Fig. 7). Click on your timeline anywhere between frame 10 and 20, choose “Insert > Timeline > Create Motion Tween”. Finally, add a new keyframe at frame 15, select our rectangle symbol (it should be about 1/2 way across your button), and scale it to about 200%. This will now be our button animation. What about the “mask” layer we made? Well, I’ll get to that shortly, but let’s make our menu and set our ActionScript so you can see why we will need a “mask” layer.

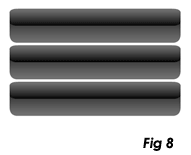
Return to the main timeline (Scene 1). Let’s add 2 new layers and label the top layer “actions”, the second layer “text” and the bottom layer “buttons” (with our “mc_btn1″ symbol on the “buttons” layer). Next, add 2 more instances of our “mc_btn1″ symbol to our “buttons” layer, and postion all 3 button symbols so they are left aligned and stacked (Fig. 8). Click on the top button, and in our Properties panel, give it an instance name of “btn_home”. Give the second button an instance name of “btn_about” and the bottom button and instance name of “btn_contact”.

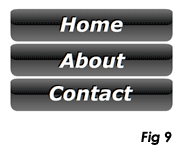
On the “text” layer, draw a text box over the top button and type the word “Home”. On the second button, draw a text box and type the word “About”, and on the bottom button, draw a box and type the word “Contact” (Fig. 9).

Our buttons are now ready to have the ActionScript added for the mouse events. There are multiple ways of adding this script, and I have written a previous tutorial about creating buttons with movieclips where the actions are applied directly to the button. For this tutorial, I’ll show you another way, which is by adding the actions to the “actions” layer of our main timeline. Either way is suitable and there are advantages to both, so what I suggest is you experiment with both ways and decide for yourself what you like better.
—- ads by google —-
On frame 1 of the “actions” layer of our main timeline, add the following code to the Action panel:
btn_home.onRollOver = function() {
_root.btn_home.gotoAndPlay(“over”);
}
btn_home.onPress = function() {
_root.btn_home.gotoAndPlay(“down”);
}
btn_home.onRollOut = function() {
_root.btn_home.gotoAndStop(“off”);
}
btn_home.onRelease = function() {
_root.btn_home.gotoAndStop(“off”);
}btn_about.onRollOver = function() {
_root.btn_about.gotoAndPlay(“over”);
}
btn_about.onPress = function() {
_root.btn_about.gotoAndPlay(“down”);
}
btn_about.onRollOut = function() {
_root.btn_about.gotoAndStop(“off”);
}
btn_about.onRelease = function() {
_root.btn_about.gotoAndStop(“off”);
}btn_contact.onRollOver = function() {
_root.btn_contact.gotoAndPlay(“over”);
}
btn_contact.onPress = function() {
_root.btn_contact.gotoAndPlay(“down”);
}
btn_contact.onRollOut = function() {
_root.btn_contact.gotoAndStop(“off”);
}
btn_contact.onRelease = function() {
_root.btn_contact.gotoAndStop(“off”);
UPDATE: I’ve been finding several readers having trouble with doing a straight copy/paste of this code from the Web. I believe the issue lies in the quotation marks (”). When copying from the Web, it sometimes uses “smartquotes”. If you are getting an error on test regarding the quote marks, first step is to be sure you are using regular quotes (type them in instead of copy/paste from the Web site). If you are still having problems, feel free to drop me a comment and I will try my best to help resolve your issues. – Mike
Let me try to explain the code:
What we are doing is setting up some functions to control the timeline of each button. For instance:
btn_home.onRollOver = function() {
is saying “whenever the users mouse rolls over the “btn_home”, perform the actions between the curly brackets”.
_root.btn_home.gotoAndPlay(“over”);
}
This is saying “play our “btn_home” timeline starting at the frame labeled “over””
Hopefully from that explanation, you can figure out that the rest of the code is setting up the different actions (play or stop) for the different mouse events (onRollOver, onPress, onRelease and onRollOut) for the different buttons (btn_home, btn_contact and btn_about).
When you test your movie, you should have something that looks similar to this:
Looks pretty good, except one problem… when we rollover the second and third buttons, we see our animation spill over onto the buttons above. What do we do now? Well, remember that “mask” layer we created in our button movieclip? That’s how!
I’ve written a previous tutorial on working with masks in Flash that gets a little more in-depth about creating masks, so I will only go through it quickly here, but you should get the jist of it. Of course I suggest you check out my working with masks tutorial if you would like more information.
Returning back to our .fla file, double click on any of our button symbols to bring us into the symbol editing mode. On our “lower button” layer, select the rectangle and choose “Edit > Copy” (cmd-C). Click on frame 1 of our “mask” layer and choose “Edit > Paste in Place” (shift-cmd-V) to place our rectangle on the stage. Again on our “mask” layer, double click on the icon next to the layer name to bring up our Layer Properties window. In our Layer Properties, click on the “Mask” radial button. Now on our “highlight” layer, open the Layer Properties window and select the “Masked” radial. (Again, for further explanation on working with masks, please refer to this tutorial).
That’s it! Our menu is done. Now when you test your movie, you should see the highlight animation on only the button your mouse rolls over.
I hope you enjoyed this tutorial and as always, comments are welcome. Thanks for reading!
Source Files (Flash 8): Flash Tutorial: Button with Mask Animation


I was just wondering how you script these buttons to take you to different pages in your flash file.
-Josh
Sorry Josh, I forgot to describe this in my tutorial, good catch. Very simple to to… on the onRelease function, you would use the “getURL” action. For example:
btn_home.onRelease = function() {
_root.btn_home.gotoAndStop(”off”);
getURL(“http://www.yourdomain.com”, “_blank”)
}
This would open the web site in a new window.
Similarly, you could point to other places in your Flash animation as well. For instance, you could use something like this:
btn_home.onRelease = function() {
_root.btn_home.gotoAndStop(”off”);
_root.gotoAndStop(“frameLabel”);
}
I’ll write an update to this tutorial when I get a chance to explain this more fully, but hopefully this helps you out so far. Any other questions, please feel free to ask!
– Mike
Thanks I have real need for thish lesson
:razz::lol:
hi nice tut:sad:
hi, thanks for your informative tutorial on how buttons can be animated and using the mask effect, but can it also serve as a page indicator, like when the viewer clicks a button for example the about button they know exactly that they are in the about page, thanks again
Hi Jun,
The answer to your question is “yes, of course”, but it can be a little tricky…
A quick way to set it up would be to change the onRelease action to this:
btn_contact.onRelease = function() {
_root.btn_about.gotoAndStop(“down”);
}
with “down” being the state that you want to show when the user is on the “About” page. You can of course add a new frame/animation with a new label (i.e. “onPage”) with the state that you want the button to be when you’re on the about page. However, just doing that means that whenever you roll over the button again, it will change the button states, and then you lose that “onPage” since it was on the release. So, what you really want to do is call the “onPage” label at the “About” page, and not as a mouse function. Does that make sense?
You’re question requires a little more advanced scripting than I wanted to demonstrate in this beginner tutorial. I’m actually working on another tutorial that uses this menu to navigate a simple flash site, so I will take your comment into consideration, and hopefully be able to answer your question there. Check back soon!
Thanks for reading, and if you have any more questions, let me know and hopefully I can help you out.
– Mike
Hi, I found this very interesting, but I got a problem, when I run the first animation the debug tells me that I got 12 errors.
**Error** Scene=Scene 1,
layer=action,
frame=1:Line 2:
Operator ‘=’ must be followed by an operand
_root.btn_home.gotoAndPlay(”over”);
and all are the same. What can I do to fix it???
and by the way, Im learning a lot from your tutorials.
Hi Alex…
Hmm, not sure why you would get that error. I’m trying to duplicate on my file, with no luck… Can you paste the code you are using here and I can take a look? Also, try downloading the source file (at the end of the tutorial) and see if you get the same error on test. I will note that you should not have an equal (=) sign on frame 1 line 2 based on my tutorial, so not sure why it would say that. Hopefully I can help you fix your issue.
Thanks for reading!
– Mike
Hi Mike,
Ive just tried the above tutorial and when i try to test the movie, it gives me the error;
This type of quotation mark is not allowed in ActionScript. Please change it to a standard (straight) double quote.
I am using flash 8.
Hi Chris,
The error your getting is most likely from when you copy and paste directly from the web page. When you copy and paste from a browser it sometimes uses smart quotes. Simply code into the ActionScript code and be sure all the quotes (“) are not smart quotes (just delete and retype using the quote marks).
This should solve the problem. Sorry for the confusion (and I’ve had other readers experience the same problem).
If you still have a problem, let me know and hopefully I can help solve your issue.
Thanks for reading!
– Mike
Its ok mike, ive sorted it. When you copy and paste the actionscript code from this page, the quotes in the actionscript appeared slightly differently when i copied them into flash. I deleted each quotation and simply retyped them and now all is working fine.
Yup, just sent you that info. Sorry for the confusion. Glad you got it working. I’ve updated the post with the info.
Thanks,
Mike
Hi mike,
Sorry, one last question How would you make the highlight loop continuously until you moved the mouse off the graphic?
Hi Chris,
To make the animation loop, simply change the “stop();” action on frame 20 of your button movieclip to read:
gotoAndPlay(“over”);
This will send the playhead back to the “over” frame when it hits that frame. Hopefully that makes sense, but if not, just let me know.
– Mike
Very good presentation. I like all your tutorials. Keep up the good work.
it is really a helpful tut….specially for the noob like me…
more power!!!
hope to see more tut from you bro..
tnx!:wink:
how do i link the button to open up another page when click on
Great tutorial! I need more tutorials telling me how to draw the cool stuff. The programming part is easier for me. If anyone needs it, the ActionScript3 code is something like this:
setupMouse (btn_home);
setupMouse (btn_about);
setupMouse (btn_contact);
import flash.display.MovieClip;
function
setupMouse (mc:MovieClip)
: void
{
mc.addEventListener (MouseEvent.MOUSE_OVER,
function(evt:MouseEvent):void { mc.gotoAndPlay (“over”); } );
mc.addEventListener (MouseEvent.MOUSE_DOWN,
function(evt:MouseEvent):void { mc.gotoAndPlay (“down”); } );
mc.addEventListener (MouseEvent.MOUSE_UP,
function(evt:MouseEvent):void { mc.gotoAndPlay (“off”); } );
mc.addEventListener (MouseEvent.MOUSE_OUT,
function(evt:MouseEvent):void { mc.gotoAndPlay (“off”); } );
} // setupMouse
Hi Mike,
I love the tutorial. I have tried everything and it is fine but I can’t seem to get the actions to happen more than once. Everytime I press the animation works but the rollover animation only works the first time and then nothing happens. Any clues as to what I might have missed or done wrong?
Thanks,
Shane
Mike,
Your tutorial was absolutely amazing.. you are more clear and precise than anyone else on the web, thank you so much. How would i link the onrelease function of the button to a window within my own website and not through opening up a new window?… is that something that would be easier done through dreamweaver? I guess it goes without saying that i’m not used to all this. THANKS A TON
Hi Alex,
Thanks for the feedback, glad to know my tutorials are appreciated.
To link to a Web page, you would use the “getURL” action. So, in the case of this tutorial, you might have something like this:
btn_about.onRelease = function() {
_root.btn_about.gotoAndStop(”off”);
getURL(“http://www.yourdomain.com/about”);
}
Hopefully that helps you out. Another tutorial that you might find helpful for this (although it’s more advanced ActionSript than this one), is a tutorial I wrote for dynamic buttons. Hopefully between the two you will be able to accomplish what you’re looking to do. If not, let me know and I can write up a clearer explanation.
Thanks for reading!
– Mike
Thanks very much for the tutorial Mike.
Also wanted to say thanks to Alan for providing the AS3 code.
from where do i get this software:cry::cry:
:sad:please tell me or give me a link to download this software
SYED
Hi Syed,
This tutorial uses Adobe (formerly Macromedia) Flash software. The software can be purchased at many computer software sellers or at the Adobe Website http://www.adobe.com.
Hope this helps, thanks for reading!
– Mike
hey mike,
thanks again for the help, however recently as i have been creating buttons for my website project ive noticed some problems that are inconsistant and dont make much sense?
I applied movieclip symbols to text so that when my mouse rolls over they expand, i also have a mask layer symbol over that text that i use to give an alpha effect making the text brighter as it expands. Lately with some of my buttons, half the word or the second word of my button will start blinking as it runs through the clip. I’ve checked my mask layer and can’t seem to figure out why this is doing this. Also this problem isn’t consistent as some of the buttons that i’ve made (done exactly through this tutorial) work out perfectly.
Have you ever encountered this problem before?
Hi Alex,
Not sure what is going on with your buttons. Hard to say without seeing the file. If you want you can try emailing me the file (contact@spitshine-design.com) and I can try troubleshooting it for you.
– Mike
Animating buttons using a mask effect…
Create a slick menu by adding animation to your buttons on rollover. Learn button animation, masking effects and how to use the gradient tool….
Due to overwhelming response to this tutorial, comments for this post are closed. If you are having problems, please refer to other users comments above, as the issue may already have been addressed.
Thanks for reading,
Mike