Flash Tutorial: Working with Masks in Flash
Level: Beginner, but some basic knowledge of the Flash user interface is expected.
Version: I will be using Flash CS3 and AS2 (although tut is compatible with earlier versions of Flash) and instructions are for the Mac. Windows users would use the PC counterparts for specific instructions on Flash Menu/Shortcut instuctions.
Description: In this Flash tutorial, I will demonstrate how to create a simple mask effect.
Demo:
Let’s get started!
Select “File > New” (command-“N”) and select Flash File (ActionScript 2.0) to open a new Flash document file. Save the file, and give it the appropriate name. I will call this “masking_tut1.fla”. Feel free to make the document dimensions (“Modify > Document or “command-J”) whatever you like, but I chose to use a size of 320 x 320 pixels. Give your timeline 4 layers. Name the top one “actions”, the second one down “mask”, the third one down “image 1″ and the bottom one “image 2″.
For the purposes of this tutorial, I have chosen 2 images… you can use your own, or you can use the ones I have by downloading the images below (click and drag to your desktop). These images were downloaded from the internet for the purposes of this tutorial and ARE NOT for commercial use.


Note: if you use your own images, be sure they are the same dimensions (I have used 280×280 pixels).
Now, we need to import these images to our Flash file. While in our .fla document, go to “File > Import > Import to Library”. Find the location of the images you will be using, and click “import to Library”. You should now see your images in the Symbol Library (“Window > Library” or cmd-L). (Tip: You can also select “File > Import > Import to Stage” (command-R), which would place the images on your stage as well as in your library. Because we will be placing our images on separate layers, it is just as easy to import to the Library only).
—- ads by google —-
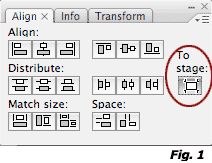
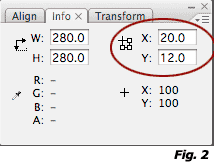
On our “image 2″ layer, place the image that you want to appear first on the center of your stage. (Tip: to center an object on the stage, use the “Align” panel (Window > Align or cmd-K). Be sure to select the “align to stage” icon (Fig. 1)). Now, place the second image in the same place on the “image 1″ layer. (Tip: you can use the Align panel again to center your image on stage, or you can use your “Info” panel (Window > Info or cmd-I) and set the x and y coordinates (Fig. 2)).
Now that our images are on the stage, let’s start creating the mask for our project. The first thing we will need to do is create a movie clip for our mask animation. For this, we will just use a simple circle.
Select the Oval Tool (O) and apply any color fill and a stroke of none. On the “mask” layer, draw a circle on the stage that covers your entire picture. (Tip: hold alt-shift when dragging to create a perfect circle outward from the spot you begin dragging your mouse.) Select the entire circle, and select “Modify > Convert to Sybol” (F8) and convert your circle to a graphic symbol, and give it an appropriate name, I’ve used “img_circle”. Click on your new symbol, and again choose “Modify > Convert to Symbol” (F8), but this time select the movie clip radial and give your symbol an appropriate name, I will use “mc_circle”. Let’s also give our movie clip symbol an instance name in the Properties panel (“Windows Properties > Properties” or cmd-F3.
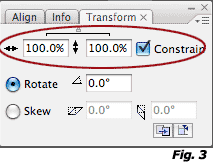
Double click on your cirlce to bring us into the symbol editing mode of our movie clip (Note: be sure you only selected the symbol editing mode once since we want to edit our MC, not our Graphic). On Frame 10 of our timeline, insert a new Keyframe (“Insert > Keyframe” or F6). Click on any frame between 1 and 10 and select “Insert > Timeline > Create Motion Tween”. Now, on Frame 1 of our timeline, select the circle and scale it to 0%. (Tip: to scale a symbol to a specific percentage, use the Transform palette (Window > Transform or cmd-T (Fig. 3)).
What you should now have is an animation of a circle growing out from the center of your stage. However, we don’t want this to loop, so we need to add a “stop” action to our mc_cirlce. To do this, let’s add a new layer in our mc_circle and call it “actions”. On the last frame of our “actions” layer, add a new keyframe and add the following code to our Actions panel:
stop();
This simply stops our circle from playing more than once.
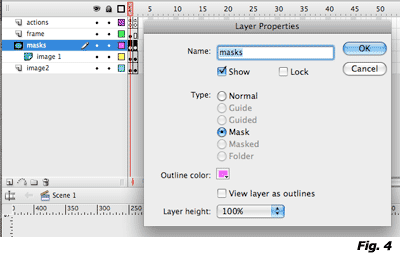
Return to the main timeline. In the timeline, on our “mask” layer, double click on the little icon to the left that looks like a square with one corner turned up. This will open the “Layer Properties” window (Fig. 4). Tip: You can also open this window by control-click (or right-click) on the layer and selecting “Properties”. In the properties window, click on the “Mask” radial. This converts the layer to a mask. Tip: click “Normal” to return to the regular viewing mode.
Now that we have set our Mask layer, we need to set the layer that we want to be masked. In order to set a layer to be masked, it has to be directly BELOW the layer that we have set as a mask. We want to set our “image 1″ layer to be masked, so to do this, we go into the Properties window of our “image 1″ layer and click the “masked” radial. You will notice in your timeline our “masked” layer is indented a little, and the icon has changed to a little blue “grid”. This tells us our mask is set. Tip: You cannot preview the mask in the Flash authoring environment unless both the mask layer and the layer being masked are locked.
Go ahead and test your movie. You should see your first image on the stage and then the second image come out as a circle (a little hard to descibe, so you’ll just have to test the movie). That’s pretty much all there is to making a mask effect, but the only problem is this only happens once, so let’s add a little more to our Flash file to get it to show again when the user presses a button.
To do this, add a second keyframe to all of your layers. On Frame 1 of our “actions” layer, insert the following code in the Actions Panel (Window > Actions or alt-F9):
stop();
_root.mc_circle.gotoAndPlay(1);
On Frame 2 of our “actions” layer, insert the following code in the Actions Panel:
stop();
_root.mc_circle.gotoAndPlay(1);
You’ll notice that the exact same code was added to both frames. I will explain the code below, which will hopefully help you understand why it is the same, but first, let’s finish out the steps needed to complete our tutorial.
The next thing we need to do is “swap” our images on the second keyframe so that in Frame 1, image 1 is above image 2, and in frame 2 image 2 is above image 1. Yes, you can find tutorials out there about “swapDepths”, a flash method that swaps the visual layer of two symbols. However, since this tutorial focuses on masking, I will just use a very simple method of doing this for the purposes of this tutorial.
All we need to do is click on Keyframe 1 of our “image 1” layer, go to “Edit > Timeline > Copy Frames (alt-cmd-C) to copy that keyframe, and then click on keyframe 2 of our “image 2” layer and go to “Edit > Timeline > Paste Frames” (alt-cmd-V) to paste our image in that keyframe. We then need to do it again but this time copying keyframe 1 of our “image 2” layer, pasting it to keyframe 2 of our “image 1” layer. (I know, this probably sounds confusing, but follow the directions specifically and you should find it quite simple).
Now, if we test our movie, you should be able to see the effect repeated everytime you hit the “Enter” key (by default, the “enter” key tells flash to play the main timeline). But, what we really want is to have it change on the press of a button, so let’s go ahead and add a button to do this. Since the purpose of this tutorial is to demonstrate a mask effect, I won’t get too in-depth about how to create a button, so this will be a very simple button.
In our main timeline, add a new layer above our “mask” layer and lable it “button”. With our text tool, draw a text box on the stage under our image and type “Play Again”. Click on the text, and convert this to a symbol, selecting the “button” radial, and giving it an appropriate name, I will use “btn_play”. Double click on our button symbol to bring us to editing mode.
Click on the Keyframe under the “Hit” state, and insert a new keyframe. On this layer, draw a solid rectangle around our text. Don’t worry that it covers your text, the “Hit” state of a button is not visible, it just sets the area that the mouse needs to be over to click on that button. Now that we’ve drawn our button, let’s go back to our main timeline (Scene 1) and add the ActionScript to our button.
Again, in our main timeline, click on our button symbol, and apply the following code to the Actios Panel:
on (press) {
_root.play();
}
What this does is tell our main movie to play whenever the user clicks on the text.
That’s it, we are now done! Go ahead and test your movie. Now, whenever you click on the “Play again” text, you should see the masking effect take place again, revealing the opposite picture everytime.
Now, let’s try and explain the code:
stop();
This stops our main timeline animation, but NOT our “mc_circle” (our “mask”) animation.
_root.mc_cirlce.gotoAndPlay(1);
This starts our “mc_circle” animation (our “mask”) whenever our movie enters that frame. While this line of code isn’t necessary for Frame 1 of our movie the first time it loads (the very start of our movie), it is needed for anytime we reach that frame again. What our “Play again” button is doing is essentially toggling between frames 1 and 2 of our movie, thus restarting our mc_circle from the beginning everytime. Since we swapped the layers of our images on each frame, you will see the opposite image be revealed everytime the user clicks the text.
Some really great effects can be created using masks, and this tutorial really only touches on the concept of masks, but hopefully it provided a good starting point for using mask effects. I hope to do future tutorials that demonstrate some more complex masking effects, but until then, I encourage you to play around with masks and hopefully this tutorial will help you get started with experimenting.
Thanks for reading, and as always, comments are welcome.
Source Files (Flash 8): Flash Tutorial: Using Masks in Flash


very nice thank you
very helpful thank u:razz:
:razz:I really learned a lot!!!!
[…] Masks in Flash – Tutorial […]
:smile:thank u
thanks very helpful specially the stop script!!!
more power!:smile:
I read similar article also named , and it was completely different. Personally, I agree with you more, because this article makes a little bit more sense for me
love when it is working !!!:mrgreen:
Hi…very nice document. It gives more clear idea….thanku..
Can u just tell me where i can get more details and tutorials regarding flash. and that tutaorial must be like this ..Descriptive….
thanks brother.:smile:
Hi dipankar,
Thanks for the compliment, I’m glad you found this tutorial helpful. There are plenty of resources on the Web to find Flash tutorials, some are really great, some not so much. A few of the better sites are kirupa.com, learnflash.com (video tutorials), and good-tutorials.com (a tutorial list site, but they review the tutorials first). A lot of the listing sites like tutorialized.com and flashperfection.com have good links, but they also have ones that aren’t so great.
As an aside, I’m currently working on a new site: gotoandlearnflash.com which I hope to be a great resource for quality tutorials that hopefully users can review. It should be up and running in a couple weeks.
Thanks for reading, hope this helps.
– Mike
Its realy nice masking effect
Really nice, have to say:grin::razz:
Flash Tutorial: Working with Masks in Flash…
Some really great effects can be created using masks, and hopefully this tutorial provides a good starting point for using mask effects….
Due to overwhelming response to this tutorial, comments for this post are closed. If you are having problems, please refer to other users comments above, as the issue may already have been addressed.
Thanks for reading,
Mike