Flash Tutorial: Dynamic Buttons
Flash Tutorial: Adding buttons dynamically to the Flash stage using ActionScript
Level: This is an intermeidate lesson, so I will assume that the reader is familiar with the basic use of the Flash software including stage, timeline, drawing tools, property window, etc.
Version: I will be using Flash CS3 and AS2 (athough tut is compatible with earlier versions of Flash) and instructions are for the Mac. Windows users would use the PC counterparts for specific instructions on Flash Menu/Shortcut instuctions.
Description: In this tutorial, I will explain how to add buttons to your Flash movie with dynamic text content using ActionScript:
Demo:
Let’s get started!
Note: For this tutorial, I will be using the buttons I created for a previous tutorial titled “Animating a button using a mask effect”.
If you haven’t already, I recommend you start with that tutorial, as I will not be going over the animation process of the button symbols in this tutorial. If you already know how to create button animations, you can use your own button animation symbol, or download the previous tutorial source file here.
—- ads by google —-
Select “File > New” (command-“N”) and select Flash File (ActionScript 2.0) to open a new Flash document file. Save the file, and give it the appropriate name. I will call this “dynamicButton_tutorial.fla”. Feel free to change the document dimensions to whatever you like (“Modify > Document or “command-J”), but for the purpose of this tutorial, I will use 250×100 pixels.
Choose “File > Import > Open External Library” (shift-cmd-O), and navigate to where you placed the source file of our previous tutorial (btnWithMask_tut1.fla) and click “Open”. What this will do is open up just the “Symbol Library” of that source file. Tip: You can also access the symbol library of any .fla file you have open with the dropdown menu in your Symbol Library window (Fig. 1).
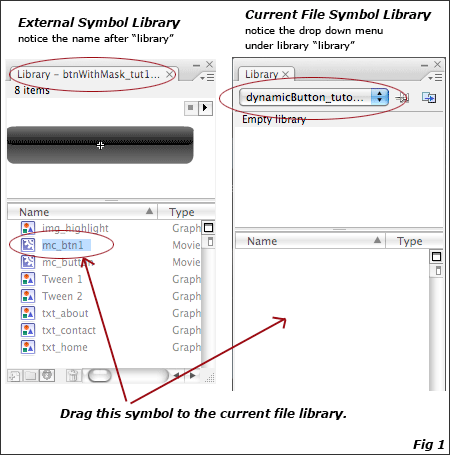
We will be using the symbol called “mc_btn1″ from the Button With Masked Animation source file, so we can simply click and drag this symbol from one library to the other. (Fig. 1). If you notice, when you drag the one symbol, it should also place the symbol “img_highlight” in your current file symbol library. This is because the “img_highlight” symbol is used within the “mc_btn1″ symbol, so Flash knows to import all associated symbols as well.
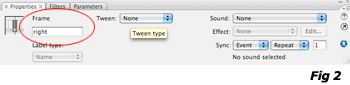
You can go ahead and close the external symbol library so save space since we don’t need any other symbols from there. In our dynamic button .fla symbol library, double click on our “mc_btn1″ symbol to bring us into symbol editing mode. You should see several layers and animation tweens in your timeline. We are going to leave all of this as is, so go ahead and lock all of these layers. What we need to do is add our text boxes that we will be using as our button labels. Add a new layer above your layer named “mask” and call it “text”. WIth the text tool (T), draw a box roughly the same width of our button, and position it on the center of our button shape. Select your text box, and in the Properties Panel (WIndow > Properties > Properties (cmd-F3)), and give it the settings in Fig. 2.
Now, select the text box, choose Edit > Copy (cmd-C) and then Edit > Paste in Place (cmd-shift-V), and move it 2 or three pixels up and to the left. In Properties Panel, leave all the settings the same, except change the instance name from “textBlack” to “textWhite”, and change the color to white. What we are doing is simply giving our button label a basic “dropshadow” effect, just to make it more easily legible on all the button states.
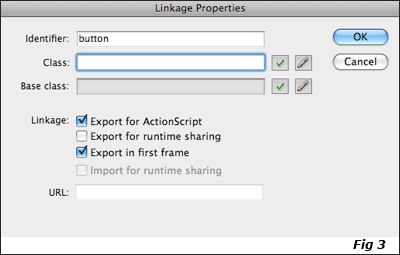
We are now done editing our button, but since we are going to be placing our button on the stage using ActionsScript, the final thing we need to do is assign our buttona “Linkage” identifier name. Not to be confused with “symbol name” or “instance name”, an identifier name is used to call our button in ActionScript in order to be place on our stage. To give you button an id, right-click (control-click) on your button symbol in your library, and select “Linkage…” from the menu. This will open the Linkage Properties window (Fig. 3). Click on the “Export for ActionScript” check box and in the “Identifier” field, type “button” and hit OK.
Now, it’s time for our ActionScript. It may look like a lot, but don’t be too intimidated, it’s not nearly as complicated as it looks, I promise!
On our main timeline, click on the first (and only) layer and give it a name of “actions”. In keyframe one, open the Actions Panel (Window > Actions or alt-F9) and paste the following code:
onLoad = function(){
var button:Array = [home, about, contact];
var xPosition:Number = 50;
var yPosition:Number = 15;
for(i=0;i<button.length;i++){
_root.attachMovie(“button”,”btn”+i,_root.getNextHighestDepth());
_root[“btn”+i]._x = xPosition;
_root[“btn”+i]._y = yPosition;
yPosition = yPosition + 25;
_root.btn0.textBlack.text = “Home”;
_root.btn1.textBlack.text = “About”;
_root.btn2.textBlack.text = “Contact”;
_root.btn0.textWhite.text = “Home”;
_root.btn1.textWhite.text = “About”;
_root.btn2.textWhite.text = “Contact”;
_root.btn0.link = “http://www.spitshine-design.com”;
_root.btn1.link = “http://www.spitshine-design.com/about.html”;
_root.btn2.link = “http://www.spitshine-design.com/contact.html”;
_root[“btn”+(i)].onRollOver = btnOver;
_root[“btn”+(i)].onRollOut = btnOut;
_root[“btn”+(i)].onRelease = btnRelease;
_root[“btn”+(i)].onPress = btnPress;
}
}
function btnOver(){
this.gotoAndPlay(“over”);
}
function btnOut(){
this.gotoAndPlay(“off”);
}
function btnPress(){
this.gotoAndStop(“down”);
}
function btnRelease() {
this.gotoAndStop(“off”);
getURL(this.link);
}
That’s it! Go ahead and test your movie. You should see 3 buttons appear, stacked, with the top one labled “home”, the middle one labeled “about” and the bottom one labeled “contact”. You should also see the animation on the different rollover states as well.
Since there is a lot of code here, rather than explain it all here, I decided to heavily comment the code in the source file. Since the real objective of any tutorial is for the reader to actually learn WHY things work and not just how, I encourage you to download the source file and read through the comments. The comments also help to explain the different items that need to be edited to customize your menu, such as placement, position and labels.
As always, I hope you found this tutorial helpful, and comments/questions are welcome. Thanks for reading!
Source Files (Flash 8): Flash Tutorial: Character Movement with Arrow Keys


[…] will explain how to add buttons to your Flash movie with dynamic text content using ActionScriptread more | digg […]
[…] LIIN wrote an interesting post today onHere’s a quick excerptNote: For this tutorial, I will be using the buttons I created for a previous tutorial titled “Animating a button using a mask effect”. If you haven’t already, I recommend you start with that tutorial, as I will not be going over the … […]
[…] unknown wrote an interesting post today onHere’s a quick excerptYou should see 3 buttons appear, stacked, with the top one labled “home”, the middle one labeled “about” and the bottom one labeled “contact”. You should also see the animation on the different rollover states as well. … […]
A way to get in virtual world
[…] is familiar with the basic use of the Flash software including stage, timeline, drawing tools, propehttp://mikestickney.com/wordpress/flash-tutorial-dynamic-buttons/Adobe Media Player: A Good Start TechNewsWorld.comThe new Adobe Media Player 1.0 is a good first […]
10 out of 10 of the tutorial
1 Q? could you help to understand how to use flashvar are something smiler to load the links in from HTML (PHP), it is making trying to do it, new to Actionscript.
thanks
Hi Lyndon,
Thanks for the rating…
Not sure I understand the question. If you are looking to load links in dynamically, you would use XML (not sure how to load links in with HTML or PHP). It’s definitely something worth learning, but is well beyond the scope of this tutorial. I’ll see what I can come up with, or point you in the right direction in order to do this.
Thanks for reading!
– Mike
hi, i need a lit help, as i am new to action script thing, i have a circle that creates different number of sections depending on dynamic data from a php file, each section has a random color value, i want to make each of those sections to dynamically act as a button,
Hope i explain my problem well, sorry for bad English.
Hi emalik,
That question is well beyond the scope of this tutorial. I’ve been working on a dynamic button tutorial that uses XML data (as opposed to php), but it’s far from complete. In the meantime, maybe this link will help you out:
http://www.adobe.com/devnet/flash/data_integration.html
Hope this helps. Thanks for reading!
– Mike
a nice clean effect i like it
very very well
Flash Tutorial: Adding buttons dynamically to the Flash stage using ActionScript…
In this tutorial, I will explain how to add buttons to your Flash movie with dynamic text content using ActionScript….
Due to overwhelming response to this tutorial, comments for this post are closed. If you are having problems, please refer to other users comments above, as the issue may already have been addressed.
Thanks for reading,
Mike