Flash Tutorial: Quick and Easy Zoom Effect on Mouse Over
Flash Tutorial: Quick and Easy Zoom Effect on Mouse Over
Level: This is a beginner level tutorial, but knowledge of the Flash drawing tools is assumed.
Version: I will be using Flash CS3 and AS2 (although tut is compatible with earlier versions of Flash) and instructions are for the Mac. Windows users would use the PC counterparts for specific instructions on Flash Menu/Shortcut instuctions.
Description: In this tutorial, I will demonstrate a quick and easy zoom in/out technique using a motion tween and a little ActionScript.
Demo:
Let’s get started!
Select “File > New” (command-“N”) and select Flash File (ActionScript 2.0) to open a new Flash document file.
Save the file, and give it an appropriate name. I will call this “zoom_tut1.fla”. Feel free to change the document dimensions to whatever you like (“Modify > Document or “command-J”), but for the purpose of this tutorial, I will use 350×200 pixels.
The first thing we need to do is draw the object that we want to have zoom in and out. You can have this be whatever you like, but I will just use a simple rectangle with some text inside it. To do this, select the rectangle tool, give a fill color (whatever you like, it doesn’t matter), and a stroke if you desire (I chose a black fill with no stroke). Draw a small rectangle on the center of your stage. With the selection tool, select your rectangle (click-drag around your shape or double click on the shape) and choose “Modify > Convert to Symbol” (F8). Give your symbol an appropriate name (I called mine “box”), select the Movie Clip radial and hit “OK”. Your rectangle is now a movie clip symbol and should be available in your Library window (Window > Library or cmd-L).
Double click on your symbol (either on the stage or in your Library) to bring you into symbol editing mode. Within your movie clip symbol, select your rectangle and choose “Modify > Convert to Symbol” (F8) again, however this time choose the Graphic radial and give this symbol a new name (I chose “img_box”) and hit “OK”. We now have a “nested” symbol… a graphic symbol that is within our movie clip symbol. Now, click on your rectangle to bring you into editing mode for the graphic symbol. Tip: you will see a “breadcrumb” of what symbol your are currently in mode under your timeline (Fig. 1).

Add a new layer to your graphic symbol and with the Text tool, draw a box in the center of your rectangle and type “Zoom” (or whatever you like). While you don’t really need text for this symbol, I wanted to try and illustrate that this tutorial will work whether your object is on one layer, or if you have a symbol with multiple layers.
We now need to edit our movie clip symbol, so you can either double click on the symbol in your Library, or use the “breadcrumb” link under the timeline (Fig. 1). Tip: you will only see the breadcrumb of a nested symbol if you select your symbol by double clicking the object on your stage. If you select your symbol in the Library, you will only see the name of the symbol you selected. It is important to remember that whether you select the symbol directly from your library or by clicking on it’s instance on the stage, you are editing ALL instances of the symbol.
—- ads by google —-
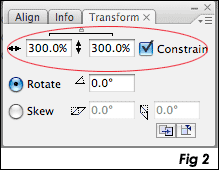
In our movie clip symbol, click on frame 15 and choose “Insert > Timeline > Keyframe” (F6). On frame 15, select your rectangle (clicking only once) and scale the symbol to about 300% (or the maximum size you want your object to be able to zoom). Tip: to easily scale an object use the “Transform” pallette (Window > Transform or cmd-T) and input a number (Fig. 2).
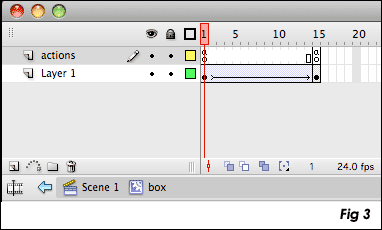
Still in our movie clip symbol, click on a frame between 1 and 15 in our timeline and choose “Insert > Timeline > Create Motion Tween”. The color of the timeline on this layer should turn a light blue and you will see a solid arrow between frames 1 and 15 (Fig. 3). What we now have is an animation of a rectangle that goes from small to large. Now, we need to add some simple ActionScript that will control the zoom effect.
Let’s start by adding a new layer to our movie clip symbol. Move this layer to the top and name it “actions”. On frame 1, add the following code to our Actions Panel (Windows > Actions or alt-F9):
stop();
this.onEnterFrame = function(){
if(zoom == true){
prevFrame();
}
}this.onRollOver = function(){
zoom = false;
play();
}this.onRollOut = function(){
zoom = true;
}
On frame 15 of our “actions” layer, add the following code to the Actions Panel:
stop();
One last thing we want to do is change the frame rate (fps) in order to give our zoom a smoother animation. To do this, choose “Modify > Document” or cmd-J to open the document properties window, and change the number in the “Frame Rate” field (Fig. 4).
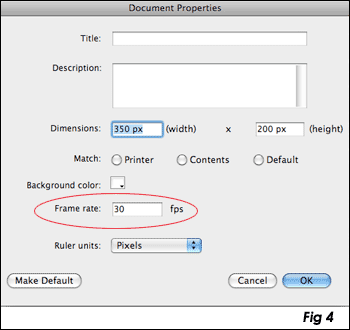
The default rate of Flash is 12, and the most common rates are 12, 24 or 30 with 30 being probably the fastest you would want to make it. For this tutorial, I have chosen to use 30 fps. Tip: “fps” stands for “frames per second”, thus changing the frame rate will also change the speed of your animation (your zoom effect). The higher the frame rate, the faster your animation. 12 fps works well for the web, especially if there is a lot of animation. Since this was a simple animation, we can get a nice smooth zoom by upping the fps to 30. We could also control the smoothness of our animation by adding or subtracting the number of frames in our movie clip timeline. The important thing to do is to find a nice balance of frame rate and length of timeline, and in most cases this is done simply by testing your movie. However, it is my recommendation to not tweak the fps once your movie is built but to add or subtract frames from your timeline.
That’s it! Go ahead and test your movie. Place your mouse over the rectangle, and you should see your object zoom in… move your mouse off the object and it will zoom out and return back to the original size.
Now my favorite part – explaining the code!
stop();
This is a simple stop action that tells our movie clip to stop playing since we want to control the animation with our mouse.
this.onEnterFrame = function(){
This is saying everytime our player enters the frame, perform the actions between the curly brackets. Note: “this.” refers to the movie clip that this action is placed in. It is optional, but good practice to use it.
if(zoom == true){
prevFrame();
}
}
The “if” statement is asking if a variable of “zoom” is true, and if it is, then perform the actions between the curly brackets.
this.onRollOver = function(){
zoom = false;
play();
}
This is saying when we roll over our object (remember “this.” is referring to the movie clip this script is in) perform the actions between the curly brackets. The actions are telling the player that “zoom” is equal to “false“, which means we are not performing the “if” statement above, but so we will “play” our movie (zooming in).
this.onRollOut = function(){
zoom = true;
}
This is telling the Flash player that when we roll off our object, our “zoom” is equal to “true“, so we will perform the if statement above which is telling the player to go to the previous frame and basically rewinding our timeline (zooming out).
While the same type of zooming effects can be created using just ActionScript rather than motion tweens (which I hope to show in a future tutorial), I hope you find that this is a very quick and simple way to create a zoom effect in Flash. And if you’re creative and understand the code, you can use this to control any type of animation, not just a zoom in/out.
I hope you enjoyed this Flash tutorial and thanks for reading. As always, feel free to leave comments below.
Source file (Flash 8): Flash Tutorial: Quick and Easy Zoom effect on Mouse Over


First of all thank you for this great tutorial. I was looking for it for a while. I have a question, though – my growing buttons work perfectly in Mozilla but IE is not letting the buttons grow and I have a border around the swf file – is there a trick to make it compatible with IE as well as Firefox??
Thanks a lot,
Cheers
Hi Julia,
I believe what you are referring to is one of the new security features in IE that forces the user to click on the flash element in order for it to have any interaction with it. I’m thinking there is a script to add to get around that, but it’s escaped me right now. I’ll try to do some research on it later, and hopefully provide a link or something on what to do.
For starters though, try clicking on the flash element first in IE and see if the zoom effect works just to make sure we are indeed talking about the same issue.
Thanks for reading!
Mike
thanks…………a lot
[…] mikestickney.com » Flash Tutorial: Quick and Easy Zoom Effect on Mouse Over […]
Thanks for the tutorial1
Question nr.2:
How to apply get url?
I tried to create an invisible button inside a Movie Clip, but no luck.
The Movie Clip (growing button) script uses on rollout event and when I apply on release to an invisible button it doesn’t work.
Hi Julia,
To add a “getURL” action to this movie clip, you can simply add the following code to the Actions on Frame 1 of your box mc (under the “zoom” code):
this.onRelease = function(){
getURL(“http://www.yourdomain.com”, “_blank”);
}
What this does is opens a url in a new window when the user releases their mouse button. Technically, you could add an invisible button to the movie clip (not sure where the code is going wrong in your case…), but I think this way should be much simpler.
Thanks for reading my tutorials, I hope you are finding them helpful! And if you have any other questions, please let me know.
– Mike
Thank you so much again for all the detailed instructions. I still have troubles though – my button goes to the url as soon as I point at it, doesn’t wait for a click or release as it supposed to. I do add the get url script to the 1st frame of the actions in mc.
Thanks for the tutorial OOOOOOh sory! Thanks for the help…………..
this sucked… it doesnt even work on my computer
Mo,
Before you start bashing this, why don’t you try and find out where the problem is. This has been tested, and seems to be working fine for others. If you’re having problems, I would be happy to help trouble shoot for you if you describe the problem or possibly send me the file.
– Mike
Thank you this really helped with my project but i have a problem. Im new to Flash, so im not sure where exactly i need to place the stop(); action in the actions panel. Do i place it straight after the code before that?
Another question I wanted to ask- is it possible to add animated text into the object?
thanks again
Hi Alev,
Not sure I understand your question about the stop(); action…. Yes, the stop(); action goes on the action panel, on Frame 1, there would be a stop(); action at the beginning of the code. On Frame 15, the stop(); action is the only code you would use.
As for the animated text, yes, you can add it as a nested movieclip. In other words, you would make a separete movie clip with your text animation, and then add that to the movie clip symbol that you have the zooming effect on (does that make sense… I’m in a bit of rush right now, so I’m trying to give you a quick explanation.). If you give me an example of what you’re trying to do, I’d be happy to give a better explanation if needed.
Thanks for reading.
– Mike
Hi Mike
Thank you so much for responding.
Ok, the problem with my movie clip is i cant get the object to remain zoomed in as long as the mouse is over it, it zooms in and then it just moves back to it orginial size. It jus wont function the way it should.
As for my project, theres a link below you could have a look at which is similar to what i want to do..accept i want to apply animated text and sound. To be specific, when a box is zoomed in I want the text animation and sound to play, does that makes sense?:???:
thanks for you time
Alev
Sorry forgot to give you the link
http://epimone.net/pieces/wave2/index.html
Hi Mike,
First of all thank you for this great tutorial. I was looking for it for a while like Julia said. I love the Lakers and I found amazing the effects (www.nba.com/lakers/roster/index.html) until to found your tutorial.I tried and it works, but I have a question because I’m new to Flash – version 8. I added a new keyframe on frame 30, new Motion Tween and I used the blur effect.Ok!
I put five mcs on stage. I want when we roll over one movie clip the others and only the others go to (“blur”)or (16).
Thansk for help me and forgive my bad english (I”m learning too)
Hi Mike,
Thank you for this useful tutorial.
I want too zoom in and zoom out upon click .How should I change the script to meet my need?
Wow… lot’s of comments this morning… I’m very excited that people are reading my tutorials!
Ok, Clara, Suely and Alev, I promise to get back to you sometime within the next day or two… I’m at my full-time job right now, so it’s tough to get to this stuff immediately, but I didn’t want to leave you hanging.
Suely, there’s a lot going on on the Lakers site, not sure where the blur effect you are referring to is… I assume the player “enlargement” is what you are referring to fro teh zoom effect (that effect can be accomplished with this tutorial). If you can send me the file you are having problems with, I can more easily get an idea of what you are doing and troubleshoot it if necessary. You can email it to contact@spitshine-design.com. (Note, if you email me I will not share the file without your permission).
I hope to help everyone as soon as possible. Thanks for reading!
– Mike
Ok, trying to get back to some of these comments this morning….
Clara, what you are looking to do is similar to this, but this tutorial actually isn’t the way to go. What this tutorial is doing is toggling between commands based on 2 different mouse actions (rollover and rolloff). What you need is to toggle between 2 different commands using the same action (mouse click). So, while at first you might think we just simply change the on roll over to on click, this would play our clip (zoom in), but when the user clicked again, it would go back to the beginning of our timeline instead of reversing the timeline (zooming out). Does that make sense?
What you want to have happen is fairly simple to do, but it really requires a different tutorial in order to not confuse people. That said, I will work on a new tutorial to show you this process, but it will take another day or two. I will get back to you as soon as possible.
Thanks for reading
– Mike
Hi Alev,
I reviewed your comment/question above… The first problem is probably that you didn’t add the “stop();” action to the last frame of the zoom animation. On the actions layer, add a new keyframe to the last frame and paste the following in the Actions Panel:
stop();
That should do the trick and it should stop as long as your mouse stays on the clip, but then zoom out wehn you roll off.
For the second part of your comment, if I’m understanding it correctly, you can add a movieclip with your animated text to the last frame of your zoom animation. When your zoom hits the last frame, this text animation would play. On rollout, it would not play and your zoom would zoom out. Might be a little confusing to understand here, so as soon as I get some time, I will do a quick mockup. I apologize that I’ve been very busy the last couple days.
Thanks for reading!
– Mike
Hi Suely,
I’ve tried to take another look at your comment above… What you want to do is possible, and not terribly difficult, but it does require some actionscript that is well beyond the scope of this tutorial. I will be happy to help you out with a solution, but it will take me a few days to get to it. I will try my best to have an answer for you as soon as possible.
Thansk for reading!
– Mike
Hi Mike,
When I add more frames with another motion guide (for blur image), if the var zoom = true make the movie back to frame 1. Else if var=false, the movie play (not even so many stops) until stoped in frame 1.
Only you can salve me. I am sending now my file.
Thanks again for your care.
Suely/Rio de Janeiro/Brasil – Yeah!
Hi Suely,
I did receive your files this morning. I will take a look at it later today and get back to you.
– Mike
Hey Mike
i can understand your busy, and thank you for not leaving me hanging.
i would very much appeciate it if you could explain how i need to follow through the whole procedure of creating the zoom images and adding the text animation (if different from the above tutorial). Do follow the tutorial above and then create the nested movieclip for my animated text? do i do this before adding the 15 frames?
I dont know if im making any sense, i do apologise if im not.
All i need to know is the order of prceeding what i wana do.
Also, im not just creating one box, im creating a row of boxes that zoom in and out.. and im guessing i require following the same procedure for each box. (?)
Sorry for being a pain..i just really want to know what im doing.
Many thanks
Alev
Hi Alev,
I will have some time hopefully later tonight to go through this for you. Yes, the first stip is to follow the tutorial above as is. If you want multiple boxes that are the same thing, then you can just use this same symbol multiple times. If you want each box to be different (i.e. if the text is different), then you would can duplicate the symbol and give it a new name for each box you need.
If I’m understanding it correctly, you want the box to zoom in and then the animated text to start once the “box” is zoomed in all the way. If that is the case, then yes, you would make the animated text it’s own movieclip and add that clip to the last frame of your zoom mc (in the case of this tutorial, frame 15). Now I hope I’m making sense..
Hope this helps you get started, but I will get back to you as soon as I can spend some more time with it.
– Mike
Thanks Mike. I think i understand, im gona give it a go and see if i can do it until i hear from you again hopefully.
Alev
Hi Mike,
Tnx you for your great, awesome and explained perfectly tutorial :wink:.
Like Julia, i wanted to apply a link at the animation. Initially I’ve had some problem with it, but now it works perfectly!
I want to say thank you for your works!
Le$o
Thanks Le$o… glad you found this helpful.
– Mike
Hey Suely,
I have sent you an email with the updated files… hopefully it helps you out. Any other problems, just let me know. I’d be interested to see your final result, and share the file here for readers who may have been following along. Let me know how it turns our, and send me the .swf if you’d like.
Good luck, and any questions, just let me know.
– Mike
Hi Alev,
I sent you an email about your questions. I think I described the approach you would take already in the comments, but if you have any questions, just let me know.
To help you out, I also created a simple file that shows what I think you are looking for:
http://mikestickney.com/wordpress/wp-content/uploads/2008/03/zoom_tut1_animatedText_flash8.fla
Let me know if this helps. Hopefully you get it working. I’d be interested to see your final results, and maybe show it here for people who have been following along.
Any other questions, just let me know.
– Mike
Hey Mike
I have managed to get my boxes function properly and i have apply sound to each of them, and i think i know how to apply the animated text aswel.
The only thing about the text is that i want them to start the same time as the sound and also want to put a stop action to them aswel. Im sending you my file to the email address youve given, so if you could listen to the sounds (conversation between two characters from the film Smokin Aces), i want the text to be the same as what is being said and want it to play only once as long as the mouse is over each box (or card shall i say).
However, i have another problem unfortunatly. If you test the movie, when a card zooms in, it appears behind the other cards!! I dont know how to resolve this, please help!
I’d like to add that Im trying to get the animated text from the Abobe After Effects text animation presets and then export into flash somehow, but dont know it that is possible. Any ideas?
Im really glad i got in touch with you, I wouldnt have been able to do this without your help.
thanks
Alev
Hail Mike,
You are AMAZING! Only one day to solve my problem.
It’s exactly what I wanted. I found your code so pretty and clean.
Perfect!!!!
When I think how much the Lakers paid for their site, HOHOHO!
So easy for you.
Thanks a lot.
I go to finish it. Soon I’ll be back!
Kisses
Hi Alev,
I would be happy to take a look at your file, but unfortunately I didn’t seem to receive your email. If you can try sending it again, I’ll take a look: contact@spitshine-design.com. Your projects sounds really interesting. Unfotunately, I’m not too familiar with AfterEffects, so not sure if I can help you with that part, but I’ll take a shot at the flash and see what I can come up with.
– Mike
Hi Suely,
Glad I was able to help you out. Nice to know my tutorials are being used to help others learn flash!
– Mike
Hey Mike
Sorry, ive sent you the file again via email. You should receive it now hopefully.
Alev
Alev,
Took a look at your file…
For starters, the issue with it appearing behind the other cards on rollover is a simple fix… Simply add a swapDepth action to the first frame of your zoom movie clips under your rollover function:
this.onRollOver = function() {
zoom = false;
play();
this.swapDepths(100);
};
Note, “this.swapDepths(100); is the only line of NEW code. Also note, the “100” is an arbitrary number, it can be anything, but it needs to be higher than the number of clips in your movie. In theory, each clip is on it’s own Depth, so if you have 20 cards, you have depths 1-20. To get the clip to go to be higher than all the clips, you need to use a number higher than your top depth. Does that make sense?
To get the sound to coincide with the animated text, I would add the sound to the text animation clip rather than the zooming clip you have now. That way it will only activate when you hit the same frame as your animated text. Also, this would make so you can set the sound to stop on rollOut… right now, if I rollon and off, the sound plays to the end, which means I can hae the same sound clip running at the same time (I don’t think that’s what you want). I didn’t work on that for the attached file, but if you have any problems let me know and I can do a mockup for you.
Any other questions, just let me know.
– Mike
Hi Mike
ive added the actionscript youve given and it works.. yey! thanks for that, didnt think it was that easy!! Although im not sure if it will still work if i was to play it on flash mx(?)
Im really struggling with the text animation, beacuse im creating the animation from scratch with the help from another tutorial, and im trying to follow through what you said earlier about making the text into a movie chip and then applying it to the last frame of the zoom animation But i cant seem to do it, Im not sure what to do when i double click to go inside the text animation movie clip..because the stage appears blank..is that supposed to happen?? I dont know what to do after that.
Or is it best to do it in the way you have explained above, to add the sound into the text animation? But i know im gona get stuck, so could you please explain how to go about doing it in more detail? im really sorry!
thank you
Alev
Alev,
The code I gave you is AS 2.0, and should work fine if you are using Flash MX. As far as your next step, I’ll try and mock something up for you and send you a new file in case you are stil lhaving problems.
Glad I could help you out.
– Mike
Hi Mike
I’m suffering. My little project sounds easy but isn’t.
Can you make a tutorial about loadMovie, attachMovie,when the right code is this.do this, _root.do that?
I changed your code many times, again and again and only thing that works, is not how I liked.
Please, forgive me and have patience with me.
I’m sending files for you.
Thanks
“I have a dream”
Hi,
Looks pretty easy. I am very new to flash and I am getting this error:
“1120: Access of undefined property zoom….”
I am using CS3 and AS3
Thanks in advance,
Natasha
hey its working good
and you explain your code in an excellent way
thanks
Thanks for helping me in learning flash. If possible pls try to help in future and also can mail me by sending flash ads to the above my personal mail id.
Thanks and regards
Divya:wink:
Hi Natasha,
This tutorial is for AS2 only. You can create it in CS3, but you would need to change your publish settings to be ActionScript 2.0.
– Mike
Hey Mike
ive managed to finish my piece..ive used after effects text animation and imported them onto flash..they are workin perfectly fine.
i just want to say thank you for all your help, dont think i would hav managed without ur assistance, i still would have been struggling.
i could send you the finished piece for you to have a look if you like.
Thanks again
Alev
Hi Alev,
Glad to see you got everything working. Happy to help!
I’d love to take a look at the final piece.
contact@spitshine-design.com
– Mike
Thanks for the article!
Quick question though. If I want to have multiple getURLs on the zoomed movieClip how is this possible? I have tried to give each “button” within the MC a unique instance name and then targeting it like so…
ok.oc.onPress = function(){getURL(“http://www.yahoo.com”, “_blank”)}
But no dice … any thoughts?
Thanks!
Hi Bradley,
Hmmm… not sure exactly what the problem here is (only have a few minutes to try and answer comments). First question is where are you putting your getURL script? It looks correct, but you would need to point to the path of the button you are pressing…
So, if your clip is called “ok” (and it is on the main timeline) and your button is called “oc” (and is on the “ok” movieclip timeline), then you would need to write the code like this:
_root.ok.oc.onPress = function(){getURL(”http://www.yahoo.com”, “_blank”)}
and put this code in the actions panel on the main timeline. Does that make sense?
If you still have trouble, feel free to send me the file (contact@spitshine-design.com) and I would be happy to help trouble shoot if for you.
Thanks for reading!
– Mike
hi i used this and its working wery good bu i need more than this if some one help me.when object zoom there will be informatin window i will write some text and i will put some pictures.really i need help
quote:
“This tutorial is for AS2 only. You can create it in CS3, but you would need to change your publish settings to be ActionScript 2.0!”
Ah! That’s answered a few questions I’ve been pulling my hair out over! Just for the line above it was worth reading
GREAT tutorial! Tought me exactly what I need! Thanks you much!:smile::smile: