Flash Tutorial: Breakout Game Tutorial Part 3
Flash Tutorial: Creating a Brick Breaking Paddle Game in Flash: Part 3
Level: This is a beginner lesson, but I will assume that the reader is familiar with the basic use of the Flash software including stage, timeline, drawing tools, property window, etc.
Version: I will be using Flash CS3 and AS2 (athough tut is compatible with earlier versions of Flash) and instructions are for the Mac. Windows users would use the PC counterparts for specific instructions on Flash Menu/Shortcut instuctions.
Description: The third part of a Flash tutorial on making a Flash game similar to the old BreakOut game for Atari. In the first part of our game tutorial, we created the movement for the paddle and the ball. In the second part of the Flash tutorial, we set up the bricks and applied the script for the collisions of the ball with the bricks. In this part of our Flash game tutorial, we will set up the game score using dynamic text.
Demo:
Let’s get started!
Let’s open up our Flash files from Part 2 of this game tutorial. While it’s not necessary, you may want to do a “Save As” and give this your document a new name (“breakthru_game3.fla”). The reason you may want to do this is it might make it easier to review each part of the Flash tutorial later.
In our last tutorial, we added the bricks for us to try and direct the ball into. What now should happen is when the ball hits a brick, that brick will disappear, and the ball will reverse angle and direction. Now, what we want to happen is in addition to the brick disappearing, we want it to add points to our game score.
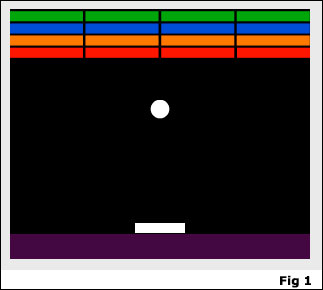
Since we will be adding our game scores to the bottom of the stage, the first thing we will do is move our paddle up about 25 pixels from the bottom of the stage. Now, lets add a new layer to our timeline under the “actions” layer, and name it “background”. With the Rectangle Tool (R), draw a rectangle (any color you wish, I’ve used a purple), with no stroke, approximately 25 pixels tall across the width of your stage (Fig 1).
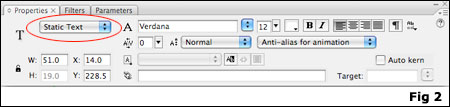
Add a new layer above your new rectangle, and label it “score text”. Next, select the Text Tool (T), and in the lower left corner of the stage, click on the stage and type “Score:” in white letters. Click on the text and in Properties Panel (“Window > Properties > Properties” or command-F3) be sure to select “Static Text” from the dropdown (Fig 2).
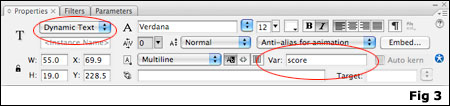
Again, using the Text Tool, draw a rectangle next to your text, and in the Properties Panel select “Dynamic Text” from the drop down, and in the “var” text field, type the word “score” (Fig 3).
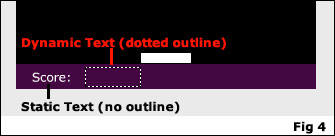
Here’s a quick little explanation on “Dynamic Text” vs. “Static Text”. When we use “static text”, whatever we type in the text box will remain exactly what we typed in Flash when we publish the Flash movie. So, for items that we know will never need to change, we can use the “static text” option. With “dynamic text”, our text can change based on ActionScript that we set in our Flash movie, using the “var” name (in this case, “score”). There are multiple ways to input and display Dynamic Text fields (including importing from an XML file and even formatting as HTML), however that is way beyond the scope of this tutorial, but I thought a quick explanation of the difference would be appropriate. Tip: A dynamic text box will have a dotted line around it (as long as the layer is unlocked), while a static text field will not have a box (unless it’s clicked on) (Fig 4). Also, you can add text to a dynamic text box, and what you type will display in Flash when you publish the Flash movie (until we add code to change it….)
What we’ll do now is set our score to be 0 (zero) when the game starts. To do this, on the main timeline, click on frame 1 of your “actions” layer, open the Actions Panel, and under the “stop();” actions, add the following code:
var score=0;
What this code is doing is making our dynamic text box with the var name of “score” display a zero when the movie opens.
Now that we have our dynamic score box, we will need to add the code to change our score when we hit the brick. We will be adding this code to our “mc_Brick” movie clip. Open the Symbol Library (“Window > Library” or command-L). In the Library panel, double click on the “mc_Brick” symbol to bring it into symbol editing mode. Click on frame 2 of the “actions” layer, open your Actions Panel (Window > Actions or alt-F9), and add the following code under the stop(); action:
_root.score += 10;
What this is saying is when we get to this frame, add 10 points to the number in our dynamic text box with a var of “score” that we set on our main timeline.
That’s it! We now can keep score for our Flash game. Pretty simple, huh?
Check back soon for Part 4 of our game tutorial where we will have the game change when we “win” (i.e. clear all the bricks) the game.
I hope you enjoyed this tutorial. As always, the source files (with comments) can be found below.
Continue to Part 4 >>
Source Files (Flash 8): Flash Tutorial: Breakthru Flash Game Part 3


:???::evil::cry::sad: I AM TRYING YOUR TUTORIAL TO LEARN FLASH BUT IT IS NOT WORKING IN MY COMPUTER I HAVE FLASH 6 AND WHEN I AM TYPE YOUR ACTION COMMAND IT SHOW ME MANNY ERRORS
SO PLZ CHECK YOUR TUTORIAL AGAIN
Hi Pratyush,
I’m sorry you are having trouble with this tutorial… Please note that this is Part 3 of an ongoing tutorial. In order for this one to make sense, you will need to go through Part 1 and Part 2 first.
Also, the source file is for Flash 8 and above, and the tutorial script should work for Flash MX and above, and the .swf should work in Flash player 6 and above.
Lastly, if you tell me the type of errors you are getting, hopefully I can help trouble shoot where you are having problems.
Thanks for reading.
-Mike
Hi thanks for your tutorial, i have a problem with the score. when the ball hits a brick the score changes in NaN and not in the amount of points.. did I something wrong? excuse me for my bad englisch but i’m from holland.
i’ve solved my problem.. in the main timeline on the action layer in frame 1 i’ve put the script: score = 0; because otherwise flash didn’t see a number and gives the not a number (NaN) message.
Hi Ruud,
Sorry you had problems, but I’m glad you were able to work it out. Not sure if setting the “score = 0″ was necessary (I didn’t need it for Flash CS3 publishing to Player 6), but either way, it’s a good addition. I updated my tutorial with instructions to add that line of code so hopefully future readers don’t run into the same problem.
Thanks for pointing it out to me, and thanks for reading.
– Mike
Hello, I noticed that your tutorial has a common glitch. When the ball hits the paddle from the side, it goes through the side bouncing up and down.
Hi Mattitiah,
Yes, you are correct… the reason is when the ball hits the side, it reverses the angle and direction, but it still reverses it into the paddle, thus basically making it go in a circle. While there are ways to correct this, this was a simple beginner tutorial whose main purpose was to get users thinking and planning about game design. In future tutorials, I hope to get into more complex gaming and different ways to handle hitTest and movement.
Thanks for reading,
– Mike
[…] Photoshop For Beginners | Adobe Photoshop Tutorial | Photoshop Review | Photoshop 7 Tutorials mikestickney.com ? Flash Tutorial: Breakout Game Part 3 Tags how to build custom computer computer tutorial pc computer own computer photoshop tutorial […]
[…] Hi Mattitiah,
Yes, you are correct… the reason is when the ball hits the side, it reverses the angle and direction, but it still reverses it into the paddle, thus basically making it go in a circle. While there are ways to correct this, this was a simple beginner tutorial whose main purpose was to get users thinking and planning about game design. In future tutorials, I hope to get into more complex gaming and different ways to handle hitTest and movement.
Thanks for reading,
– Mike […]
Yeah, I figured that out a long time ago (I’ve been trying to make one for a while). Do you have a fix for it?
My Scoreboard Wont Change Help
Help
when the ball hits the side of the paddle, it goes the opposite way. what do i change in the code so it wont go the opposite way
Hi Nachoman,
Yes, there is a little quirk in this tutorial where when the ball hit’s the side of the paddle it gets caught up. The fix is beyond the scope of this set of tutorials. These were meant for users to start thinking about Flash and game development, and some of the skills needed for game development in Flash (i.e. hitTest, scores, lives, etc). When I have time I hope to expand on these and attempt to resolve this quirk, but have been too busy lately, sorry.
– Mike
Hi Josh,
Sorry you are having problems with your scoreboard. I would be happy to help, but I would need more information. Are you getting any kind of errors? My first thought is to be sure you have all the instances/variables named correctly. Also, you can try downloading the source file at the end of this tutorial, and try to compare your to mine to see if you can find the error. If you are still having problems, you can send me the file to contact@spitshine-design.com and I can try and troubleshoot it for you.
Thanks for reading!
– Mike
hey can you use C++ to program games like this
Hi Sasha,
Sorry, I don’t know C++ or it’s capabilities. Maybe another reader out there can answer that question?
– Mike
Hi there,
I wondered if you could give a solution to stop the ball going through the sides of the paddle? I have followed a different tutorial for my breakout based game but still have the same problem. I have tried inserting a movie clip at each end of the paddle reversing the X and Y values but this creates an unusual bounce.
Hi Mr. Chief,
A few people have asked me that… I haven’t had time to work on an answer, but my initial thoughts might be to create a second paddle movieclip much thinner than the first one and use it for the hit test. So, essentially the ball would have to hit the very top of the paddle only in order to bounce back. This is only an idea, haven’t tested it yet. I know hitTest in Flash isn’t an “exact” science, so it the “paddle” hit test is too small/thin, it may not work correctly. If I can find some time, I’ll try to look into a better solution for the bounce.
Thanks for reading!
– Mike
Nan Im getting that and tried the solution above and didn’t work… help please ^_^
Hey there good tutorial, I’m just having an issue with the score. Everything seems to work it is just when I start the game the score starts at 160 and not 0. When I hit the bricks they disappear and add another 10 to the score. Not sure what I’ve done wrong
not only the paddle but the bricks also. somehow it manages to squeeze in beside the brick and get the other bricks that are near. im gessing its linked with the paddle. this is a real problem with hit testing. would really like some help with this if you have any?
Thanks
H
[…] Part 3 […]
whenever i try to get the score to go up by 10 it adds ten instead what do you think is wrong?
Creating a Brick Breaking Paddle Game in Flash: Part 3…
The third part of a Flash tutorial on making a Flash game similar to the old BreakOut game for Atari. In this part of our Flash game tutorial, we will set up the game score using dynamic text….
Very interestingly and all is clearly written
Due to overwhelming response to this tutorial, comments for this post are closed. If you are having problems, please refer to other users comments above, as the issue may already have been addressed.
Thanks for reading,
Mike