Flash Tutorial: Breakout Game Tutorial Part 2
Flash Tutorial: Creating a Brick Breaking Paddle Game in Flash: Part 2
Level: This is a beginner lesson, but I will assume that the reader is familiar with the basic use of the Flash software including stage, timeline, drawing tools, property window, etc.
Version: I will be using Flash CS3 and AS2 (athough tut is compatible with earlier versions of Flash) and instructions are for the Mac. Windows users would use the PC counterparts for specific instructions on Flash Menu/Shortcut instuctions.
Description: In this tutorial, I will explain the second part of making a game similar to the old BreakOut game for Atari. In the previous part, we created the movement for the paddle and the ball. In this part, we will set up the bricks and apply the script for the collisions of the ball with the bricks.
Demo:
Let’s get started!
Let’s open up our Flash files from Part 1 of this game tutorial. While it’s not necessary, you may want to do a “Save As” and give this your document a new name (“breakthru_game2.fla”). The reason you may want to do this is it might make it easier to review each part of the tutorial later.
In our last tutorial, we set up the movement of the ball and the paddle. The ball bounces around the stage, and when it hits either side, or the top of the stage, it reverses angle and direction. The paddle is controlled by the user using the left and right arrow keys, and when the ball hits the paddle, it reverses angle and direction. Pretty neat, but not the most fun game in the world… so what we will do now is add the bricks for the us to try and direct the ball into. What we want to happen is when the ball hits a brick, that brick will disappear, and the ball will reverse angle and direction.
Obviously, the first thing we need to do is draw our bricks, and set them up in a “grid” type alignment similar to Fig. 1 below.
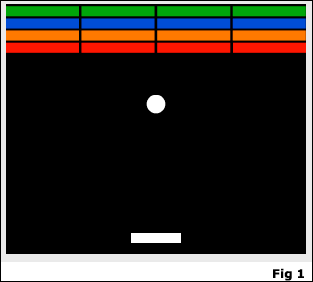
You’ll notice we have 16 different bricks that are 4 different colors. You of course can add as many or as few bricks as you want, but for simplicity I think this is a good number. Because Flash allows us to edit certain aspects of a symbol on the stage, such as color and size, without changing the appearance of our original Library symbol, we will only need to draw our brick symbol once.
Select the Rectangle Tool (R), and choose no stroke (white swatch with a red line through it in the color pallette), and a fill of red (although any color is fine). Draw a rectangle on your stage approximately 75 pixels wide by 10 pixels tall. Select your rectangle using the Selection Tool (V), and choose “Modify > Convert to Symbol” (F8), and give your symbol a name of “mc_brick” and select the “Movie Clip” radial and hit “Ok”. With your mc_brick symbol still selected, again choose “Modify > Convert to Symbol” (F8), and give your symbol a name of “mc_brickHolder” and select the “Movie Clip radial and hit “OK”.
—- ads by google —-
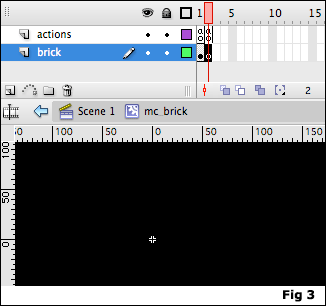
What you will now have is a nested movie clip (mc_brick is nested within mc_brickHolder) (Fig. 2). The reason we want to nest our “mc_brick” symbol inside the “mc_brickHolder” movie clip is because all of our bricks on the stage will be using the same ActionScript code. By nesting our brick symbol in a holder mc, we will only need to apply our ActionScript once (within the holder clip). While we could place each “mc_brick” symbol on the stage the same way we will the holder, if we did it that way we would need to add the ActionScript to each instance of our brick (16)… and if we need to trouble shoot, we would be trouble shooting our script 16 times. This way, we only need to add the code once, and if we need to modify the code, we only need to modify it once. I know that explanation might be a little confusing, but hopefully it makes more sense by the time you get to the end of this tutorial.

From the Library window (“Window > Library” or command-L), click on your “mc_brick” symbol to bring it into sybmol editing mode. Add a new layer and label it “actions”, and name the layer with your rectangle “brick”. In frame 2, add a new keyframe (“Insert > Timeline > Keyframe” or F6) to both layers. Select frame 1 of your actions layer, open the Actions Panel (“Window > Actions” or alt-F9), and place a stop action here:
stop();
Input another stop action on Frame 2 of the actions layer. On Frame 2 of your brick layer, delete the rectangle from the stage. Your timeline for this symbol should now look similar to Fig. 3 below.
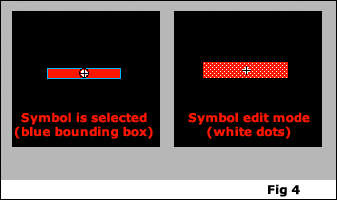
Now, from the Library window, click on the “mc_brickHolder” symbol to bring it into symbol editing mode. This is where we will be adding the Action Script that controls what will happen when our ball comes into contact with our brick. On the stage, click on the rectangle ONCE (clicking twice will bring you into “mc_brick” symbol editing mode, which is what we don’t want). Tip: if you click on the symbol on the stage once, you will see a blue bounding box around the symbol. If you are in symbol editing mode, clicking on the rectangle will show whitedots within your selection (Fig 4).
With our symbol on the stage selected, open the Actions Panel and add the following script:
onClipEvent(enterFrame) {
if ((this.hitTest(_root.ball))) {
_root.ball.yspeed = -_root.ball.yspeed;
this.play();
}
}
Here is the code explanation (which relates to the code from Part 1 of this tutorial):
onClipEvent(enterFrame) {
When we get to this frame, perform the code between the curly brackets.
if ((this.hitTest(_root.ball))) {
If our ball (“_root.ball“) moviclip touches (“.hitTest“) the brick (“this“), then perform the actions between the curly brackets.
_root.ball.yspeed = -_root.ball.yspeed;
reverse the angle and direction of the ball (set in Part 1 of this tutorial)
this.play();
}
}
And play the brick movie clip (advancing it to the blank frame of our mc_brick symbol, essentially making our brick disappear).
That’s all the ActionScript needed for this tutorial. All that’s left to do now is place our bricks onto the stage.
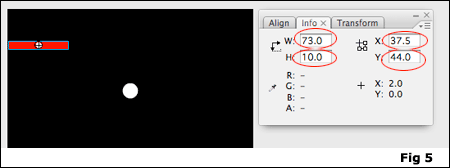
Return to Scene 1 of our flash movie. Create a new layer named “bricks” and drag your “mc_brickHolder” symbol from the library to the stage. Select the symbol on the stage, and open the Info pallette (“Window > Info” or command-I). Set the width to 73, the height to 10, the x to 37.5 and the y to 44 (Fig. 5).
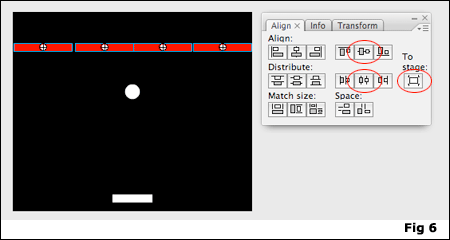
We now want to place this symbol 4 columns across and 4 rows up. Click on the symbol, select “Edit > Copy” (command-C) and then select “Edit > Paste” (command-V). This will add another instance of the symbol to your stage. Move this instance so that it sits next to your first symbol (it doesn’t have to be exact, we’ll fix it in a minute). Paste two more intances of the symbol, and align them 4 across, setting the 4th one against the right side of the stage. Now, select all 4 instances (drag your mouse over all, or “shift-click” on each symbol), and open the Align pallette (“Windows > Align” or command-K). Be sure that the “To Stage” button is deselected, and click on the distribute horizontal button and the align vertical center buttons to set all 4 instances in a perfect row, equally spaced apart (Fig 6).
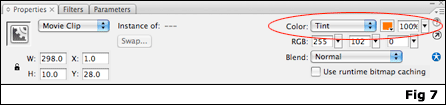
With all four rectangles still selected, do another copy paste. In the Properties panel (Window > Properties > Properties or command F3), next to “Color”, select “Tint” from the drop down, and choose an orange color from the color pallette (Fig. 7). Position this row above the row of red rectangles (you can use the Align pallette if needed). Repeat this process 2 more times, making one set of bricks blue and one green. You should now have the grid similar to Fig 1 at the beginning of this tutorial.
That’s it. We are now done with our Flash game! Go ahead and test your movie and see what happens. While this is a relatively simple and basic game, I think it’s a great start to learning about Flash game development and design. I hope you enjoyed this tutorial, and have fun playing your newly created game. In a future tutorial, I will show you how to add a scoring feature, as well as player “lives”.
Thanks for reading!
Continue to Part 3 >>
Source Files (Flash 8): Flash Tutorial: Breakthru Flash Game Part 2


[…] Flash Tutorial: Breakout Game Part 2 Flash Tutorial: Creating a Brick Breaking Paddle Game in Flash: Part 2 Level: This is a beginner […]
very good, but i my blocks will not dissapear!!
i’ve checked the code a few times, but nothing seems to be wrong.
its my first game, so go easy
Hi Max,
Sorry you’re having trouble with this. I would be happy to try and help you out, but I would need more info. If you send the .fla to contact@spitshine-design.com, I’ll take a look and see if we can’t figure out what’s going wrong.
Thanks for reading!
– Mike
i have the same problem
Hi Excel,
Sorry to hear you are having trouble as well with this. Same answer though, I would need some more info to help solve the problem. Feel free to send me the .fla you are working with and I will try to help you out.
Also, try downloading the source file at the end of this tutorial. I always try to comment my code to help users understand what’s going on, so maybe this will help you find your answer.
Thanks for reading!
– Mike
Thank you for putting this tutorial online, it really helped me understand the features of flash.
I too had this problem and i fixed it

i forget to give the ball an instance name
ahh the brick will not disappear!
i really need some help haha, ill mail you the progress so far D:
ahhh! the bricks do not disappear. i checked everything…
hmmm
is there an instance name we must give the bricks?
thanks
i fixed it!!!

new problems have arisen.
but ill figure them out
thanks
Hi Ella,
Sorry you’re having problems, but glad you’re working through them.
Still haven’t gotten a direct response as to why some people are having problems with the bricks disappearing… My best advice is just be aware of instance names (the name of a symbol on the stage) vs. symbol names (the name of the symbol in your library). While you can (and will) have multiple names for the same symbol ON THE STAGE, you can only have ONE name for a symbol IN THE LIBRARY.
Good luck, and if you have any other problems, let me know and I’ll try to help you out.
Thanks for reading!
– Mike
well my bricks will not disappear =[ i can’t email it off any hint what to do? i can’t email it because its on my college game and its like 30mb xD so thats out of the question =[
Hi Bekka,
Sorry for the late response, your email got a little lost in my overcrowded inbox…
I corrected your file and sent you a new one. Everything was working fine, except you only had 1 frame on your brickholder mc, so when the ball hit and played, it didn’t disappear since it was only looping on the same frame. What you needed was the first frame to have your brick, and the second frame to be blank. So, when the ball hit the clip, it would advance to the 2nd (blank) frame, making the brick essentially disappear.
Hope this helps, but if you still have problems, just let me know.
– Mike
was wondering if anyone can tell me what this means:
Clip events are permitted only for movie clip instances
Hi Cat,
What that means is you are most likely trying to apply some Movie Clip event code (ie. onEnterFrame) to a symbol that is not a movie clip (ie a button or graphic). If you are following this tutorial and getting that message, you are either applying the code to the wrong symbol instance or you have given the wrong symbol properties to the symbol. Double check you are applying it to the correct symbol, and if so, then you may need to set the symbol properties (right click on the symbol in the Library window and select “Properties”) to “movie clip”.
Hope this helps. Thanks for reading!
– Mike
thanks a lot i followed your advice and it works! great tutorials
OMG…. your awesome XD
I made it work..
although i restarted accidently after realizing the bricks didn’t dissappear.. hehe..too much undo
Anyways.. here was MY mistake.
At the step where adding new layers… ughh (3rd image..sry bad explanation)
I did was not in edit symbol mode but in selection mode.
hey,
in the part that we have to nest mc_brick and mc_brickHolder, i couldnt figure it out. i follawed the directions exactly but mine didnt look like fig 2 it made it so the ball would go through the bricks like they werent there. i need some help.:sad:
Thanks so much! Great tutorial.
Cheers!
carmiecarmela
hey ! i already sent you the flash file. can you please check what’s wrong with it? i also have the same problem — the bricks won’t disappear
Works great! I had the same trouble as some of the other people here, but then realized that I too forgot to give an instance name to the ball
Thanks so much!
Mark what a benevolent and patient man you are!
i have the same problem as ben. How do u make it so the ball destroys the brick, and the brick disappears?
i’ve fixed my problem with the blocks not dissappering but now the ball goes straight through the blocks
Flash Tutorial: Breakout Flash Game part 2…
In this tutorial, I will explain the second part of making a game similar to the old BreakOut game for Atari. In the previous part, we created the movement for the paddle and the ball. In this part, we will set up the bricks and apply the script for th…
got same problem the bricks wont dissapear………:sad:
Due to overwhelming response to this tutorial, comments for this post are closed. If you are having problems, please refer to other users comments above, as the issue may already have been addressed.
Thanks for reading,
Mike
[…] 1 Part 2 Part 3 Part 4 Part […]