Flash Tutorial: Play movie clip with mouse click
Update: I have written a second tutorial on playing a movie clip on mouse click that provides a different option for accomplishing this task. Check it out here.
Level: This is a beginner lesson, but I will assume that the reader is familiar with the basic use of the Flash software including stage, timeline, drawing tools, property window, etc..
Version: I will be using Flash CS3 and AS2 (athough tut is compatible with earlier versions of Flash) and instructions are for the Mac. Windows users would use the PC counterparts for specific instructions on Flash Menu/Shortcut instuctions.
Description: This is the next step to our Flash Target Game, which I started in a tutorial for a custom mouse pointer. Ideally you would want to continue with those files, but you should still be able to learn how to play a movie clip with a mouse click in Flash through this tutorial.
Demo: Play movieclip with mouse click: Demo
Let’s get started!
What we will be doing is adding a simple bullet or firing action to the scope that will be activated with the click of the mouse. Let’s start with the final file from the previous tutorial (download the file here: Flash tutorial: Custom mouse pointer). Select “File > Open” (command-”O”) to open the .fla file. Do a “Save As”, and give it the appropriate name. I will call this “target_tut_2.fla”.
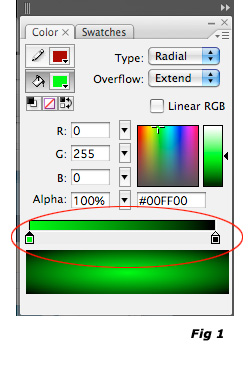
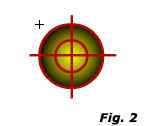
On the “scope” layer, double click on the image to bring us into the “mc_scope” editing stage. Double click on the outer circle to select it, and copy (Edit > Copy or command-C). Create a new layer, and do a Paste in Place (Edit > Paste in Place or shift-command-V). With our circle still selected, set the fill color to one of the radial gradients on the bottom of the color selector palette, and change the stroke to none. Move this layer to the bottom of the timeline, and lock all other layers. With the circle selected, you should be able to set the color of the gradient by clicking on the small square on the color scale in the color palette (Window > Color or shift-F9 (Fig. 1)), (Tip: be sure to select the color square on the gradient scale and not the paint bucket in the upper left corner of the color palette). Double click on the smaller square on the gradient scale and select a bright yellow (#ffff00). You should now have a circle with a yellow center and black edge, underneath our “scope” image (Fig. 2).
Double click on our new circle again, and convert this to a movie clip symbol (Modify > Convert to Symbol or F8). Be sure to select the “movie clip” radial, and then give it an appropriate name, I will call this “mc_bullet”. Also, we need to give this clip an instance name in the Property panel. I like to use the same instance name as my symbol name, in this case “mc_bullet”. What we will be doing is animating this symbol to make a “shooting” effect. To do this, let’s double-click on the symbol to take us into the editing mode. Once in editing mode, we need to select the circle and convert this to a symbol again, but this time we need to make this a graphic symbol, and give it a new name, I will call mine “img_bullet”. Add a new keyframe (Insert > Timeline > Keyframe or F6) on frame 6 on the timeline. Now, on frame 6, select our symbol and scale it to 0%. Select any frame between 1 and 5, and create a motion tween (Insert > Timeline > Create Motion Tween). What you now have is a very quick animation of the circle going from very full size, to very tiny (disappearing). The last thing we need is for our clip to start with a blank or empty frame, so to do this, on the layer with our circle, drag keyframe 1 to keyframe 2. You should now have a timeline that looks similar to Fig. 3 below. We now need to add some ActionScript to control this movie clip.
Create a new layer, move it to the top and name it “actions”. On the first frame of this layer, insert the following code in the Actions window (Windows > Actions or alt-F9):
stop();
What this does is stop our movie clip from playing because we only want it to play when we click our mouse. Click on frame 6 of the actions layer and insert a blank keyframe (Insert > Timeline > Blank Keyframe or F6). On this keyframe add the following code to the Actions window:
gotoAndStop(1);
What this does is send our playhead back to the start of our clip, and stops it since again, we only want it to play when we click our mouse.
Let’s go ahead and test our movie. You’ll notice that nothing is really happening. This is because we haven’t set the ActionScript that tells this movie clip to “fire” our bullet. Let’s go back to our Flash document. Go to the main timeline of our movie (Scene 1) and click on the frame 1 of the “actions” layer and open the actions window (Window > Actions or alt-F9). You should already have the following code from the previous tutorial (or something very similar):
_root.onEnterFrame = function() {
Mouse.hide();mc_scope._x = _xmouse;
mc_scope._y = _ymouse;
}
Remember from our last tutorial that this controls the movement of our “scope”. Directly below this code, add the following line of code:
onMouseDown = function() {
_root.mc_scope.mc_bullet.play();
}
This is the code that will tell our “bullet” to “fire”. Here is the code explained:
onMouseDown = function () {
This line basically is saying, whenever the user clicks on their mouse button (onMouseDown), perform the actions between the curly brackets.
_root.mc_scope.mc_bullet.play();
}
This is telling our “mc_bullet” movieclip to play. Note that our “mc_bullet” movie clip is a “nested” movie clip, which means it is placed within our mc_scope symbol. Our action needs to provide the path to our mc_bullet movieclip. So in this example:
_root = the main timeline (Scene 1)
.mc_scope = the instance name of our “scope” movieclip
.mc_bullet = the instance name of our “bullet” animation
Go ahead and test your movie again. This time, the mouse should still control the movement of the scope, and when you click the mouse button, you should see the animation of the “bullet” circle take place.
I hope you found this Flash tutorial helpful, and as always feel free to leave any comments or questions below. Also, check out a second tutorial on playing a movie clip on mouse click that provides a different option for accomplishing this task.
Source Files: Play movieclip with mouse click: Source File


If we add the bullet firing sound to the “mc_bullet” symbol timeline, it would be more realistic.
Hi, i have a question for a movie clip, i would like to move it were the mouse click, it means, if i click with the mouse on a point this MC should move slowly to this point were i click with the mouse, how can i do it?
Kudos. Great job. Been looking for something like this for ages
Nice work
-NapalmFist
Insightful. Bookmarked.
wow great tutorial. the final result looks cool.
Flash Tutorial: Play a movieclip with a mouselick…
This is the next step to our Flash Target Game, which I started in a tutorial for a custom mouse pointer. Ideally you would want to continue with those files, but you should still be able to learn how to play a movie clip with a mouse click in Flash th…
Due to overwhelming response to this tutorial, comments for this post are closed. If you are having problems, please refer to other users comments above, as the issue may already have been addressed.
Thanks for reading,
Mike