Flash tutorial: Custom mouse pointer
Level: This is a beginner lesson, but I will assume that the reader is familiar with the basic use of the Flash software including stage, timeline, drawing tools, property window, etc..
Version: I will be using Flash CS3 and AS2 (athough tut is compatible with earlier versions of Flash) and instructions are for the Mac. Windows users would use the PC counterparts for specific instructions on Flash Menu/Shortcut instuctions.
Description: In this tutorial, I will explain how to make a pointer or scope that could possibly be used for a shooting or target game. As with many things in Flash, there are different ways to accomplish this, but I found this to be pretty straight forward and simple. In future tutorials, I will be explaining more steps on how to create a target shooting game, but this is a starting tutorial and will get you acquainted with Flash and ActionScript.
Demo: Custom Mouse Pointer Flash Tutorial: Demo
Let’s get started!
Select “File > New” (command-“N”) and select Flash File (ActionScript 2.0) to open a new Flash document file. Save the file, and give it the appropriate name. I will call this “target_tut_1.fla”. Feel free to change the document dimensions (“Modify > Document or “command-J”), to whatever you like, but I chose to use 300 x 300 pixels.
The first thing I will do is draw the pointer or “scope”, similar to what you see in the movies when a sniper looks through the scope of a rifle. Select the “Oval tool” from your tool box, and use a red stroke, with no fill. Draw a small circle on the stage (Tip: holding shift when you drag the mouse will create a perfect circle). Select the entire circle and go to “Modify > Convert to Symbol” (F8). Give this an appropriate name (I will use “mc_scope”) and select the “Movie Clip” radial. Your circle is now a symbol. We will now need to edit the symbol to complete the “scope” look. Double click on the circle to bring you into the symbol. Select the entire cirlce (Tip: you will see white dots in the circle as opposed to a blue square around the circle if you are in the symbol editing mode when the shape is selected). Add a new layer to the symbol, and choose “Edit > Past in Place” (command-shift-V) to add another circle to the new layer. Select one layer (either one, it doesn’t matter), and scale this circle to 50%. (Tip: to easily scale an object, use the “Transform” pallette: “Windows > Transform” (command-T).
—- ads by google —-
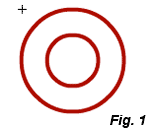
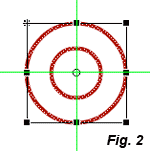
We now have one smaller cirlce inside a larger one (Fig. 1)… we now need to add the crosshairs. What we want to do is draw a cross in the center of the circle. One easy way I do this is select the outer circle and choose the transform tool. What this will do is give you a box around the outer circle with “handles” (small squares used to manipulate or “transform” the object) on all corners, and at the halfway point of each dimension. These can be used as qucik visual in order to drag guides out and find the exact center of the circle. Simply drag a top and side guide and drop on the handles at the center points of the box (Fig 2, the green lines are Flash guidelines). Now, using the line tool, we can draw a vertical and horizontal line through the circles on the guide lines (Tip: hold “shift” while dragging to create a perfectly straight line). You want to extend the lines beyond the edges of the outer circle. A little lenghty desciption here, but you should now have your scope image.
Return to the main stage (clicking “scene 1″ under the timeline). Click on the symbol once to select it, and with it selected, give the symbol an appropriate instance name in the “Properties” window. A personal preference of mine is to give it the same instance name as the symbol name, in this case “mc_scope”, but it is important to note that symbol name and instance name do not refer to the same thing. I will be writing a mini-tutorial on the difference between a “symbol” name and an “instance” name, but until then, feel free to leave a comment. Now that we have given our symbol an instance name, it’s time to get to the fun part…. adding the ActionScript!
On the main movie timeline, add a new layer and name it “actions”. (Tip: Although not absolutely necessary, it is good practice to always place your actions layer on the top layer of your document). On the first keyframe of the “actions” layer, insert the following code:
_root.onEnterFrame = function() {
mc_scope._x = _xmouse;
mc_scope._y = _ymouse;
}
(Tip: Where the code reads “mc_scope”, you would need to change to whatever you used as the instance name for your movie clip symbol.)
That’s it! We are now done! You can go ahead and test your movie. Cool huh? What? you thought there would be long lines of crazy, confusing code? Nope. Just a couple lines. Pretty simple, right?
Ok, so did you think I was going to leave it at that without explaining the code? Of course not! Here we go….
_root.onEnterFrame = function() {
The “onEnterFrame” command is telling the Flash player to perform the actions within the curly brackets whenever the playhead is on that frame.
mc_scope._x =_xmouse;
mc_scope._y = _ymouse;
}
The code between the curly brackets is what is controlling the X and Y position of the instance “mc_scope” and matching it up to the X and Y postion of the mouse. Sound confusing?
Basically, _xmouse is the X position of the users mouse on the stage… and therefore _ymouse is the Y position. Whenever the user moves their mouse on the file, these numbers will change. What we are doing is simply saying “whatever the X and Y position of the users mouse is, make that the X and Y postion of mc_scope as well”. Simple as that!
When you test the movie, you will see your mouse pointer on the stage, and wherever you move the mouse pointer, your scope will follow. I left the mouse visible to give you a better visual of what exactly is happening with the code. However, what we probably want for a more “realistic” look is to “hide” the mouse pointer and just have our scope be our mouse pointer. To do this we simply add the following line of after the opening curly bracket:
Mouse.hide();
This, as you can probably guess, “hides” the mouse pointer from the stage. However, the X and Y coordinates of where the mouse pointer would be are still established, so our code is still operating the way it should be.
Now, we are done with the first stage of a target game. Again, as with many tasks in Flash, there are multiple ways to do things, and this is just one, but I hope you found this exlpanation helpful, and I hope to continue writing more tutorials to finish a complete target shooting game.
As always, comments are welcome, whether you have question or maybe you have a better way to do this, I’d love to hear it!
Source Files: Flash tutorial: Custom mouse pointer
If you liked this tutorial, check out the second part: Adding the bullet animation and learn to play a movie clip with the mouse click in Flash.


Hey,
Brilliant, i had been trying since a long time to get my cursor personalized…and your little tutorial was really helpful thanks loads.
well…i havent yet now made a proper cursor to go on my website coz this was just a learning time. But atleast now i KNOW what to do..unlike b4 where i jus dint have any idea.
Keepup with the helpful tutorials.
Cheers!
Good thread, i like these tips, its looks that i knew just small part.
I am really appreciating this help blessing the author and awaiting future tutorials.
Thanks alot Mike.
Mike
Thanks for this tutorial. This one helped me move on with my project as well.
however, i want to ask you one last question. Is it possible to move one flash movie to another by clicking on buttons? where could i get the help from?
Promise I wont bother you again.:oops: its just that your tutorials are the most helpful compare to the others.
many thanks
Alev
Hi Alev,
Ask all the questions you want, I don’t mind. I can’t promise I’ll always have an answer, but I’ll try.
Not sure what you’re asking with this one. You can add/move/control movie clips with buttons within a single Flash movie, but I don’t believe you can control other Flash movies.
For instance, if you have a flash component at the top of a Web page, and then a block of HTML text in the center of the page, and then a Flash component at the bottom of the page, you can’t control the bottom Flash movie using buttons from the top flash movie. Is that what you are asking?
Let me know if that answers your question.
Thanks for reading.
– Mike
helleuw.. Im trying to make this crosshair but how do i select scéne one ? because when i double click it nothing happens.. please answer me,, Greetz Noturox
Hi Noturox,
Sorry you’re having trouble here… Not sue what is happening, but to note, if you are on scene 1 already, doubleclicking on the “scene 1″, you won’t really see anything change. That’s the only thing I can say that you are seeing.
To select Scene 1 (if you are in a different scene or in a symbol edit mode), you can either use the “breadcrumb” trail under the timeline (you will only see “scene 1″ listed if you are on “scene 1″) or you can choose “Window > Scenes”, which will open the “Scenes Pallette” and you can click Scene 1 from there.
Hope this helps, and thanks for reading!
– Mike
Great help But the scope was not very centered
[…] View Tutorial […]
thx heaps, but i have 1 question…now that i have a cursor, how do i add it to a game??
Hey Mike,
I ran across your site trying to figue out why my play button wouldnt reference a nested mc.
This tutorial caught my interest and I went thru it step by step. It didn’t work. Finally, after exhausting everything except deleting my movie clip of the mc_scope and replacing it with yours it worked. I suspect that this is the same problem I was having before I found your site. Do you have any idea what i may be doing wrong drawing my artwork then converting to movie clips? I’ve been trying to figure this crap out for a week now. I think I am doing everything correct so this is not much fun when all I want to do is see something move using action script.
Thanks,
Victor
Hi Victor,
I’d be happy to help you out, but not really sure what you’re trying to do, and what’s not working. If you can provide a better explanation of the problem, or send me the .fla (contact@spitshine-design.com), I’ll try to help you through it.
– Mike
brillant
Thank you!!!
I had come across a lot of custom cursor scripts before that taught me to change the cursor…but then it wouldn’t drag other objects.
You’ve made this childishly simple.:lol:
Hey hey Great tutorial thanks!
One suggestion, if you use…
_root.onMouseMove = function() {
pointer._x = _xmouse;
pointer._y = _ymouse;
}
then it will only update the custom curser when the users mouse is moved rather than using an onEnterFrame which is constantly updating, helps save some system processing
Custom Mouse pointer in Flash…
In this tutorial, I will explain how to make a pointer or scope that could possibly be used for a shooting or target game. As with many things in Flash, there are different ways to accomplish this, but I found this to be pretty straight forward and sim…
Sorry, comments have been closed for this posting.
Please review previous comments for help with any questions on this tutorial, you may find what the answer you are looking for from myself or another reader.
Thanks for reading,
Mike